Sunday, August 9, 2015

carrot cake

the simplest and yet delicious cake that anyone can make!


i n g r e d i e n t s :

  • 2 big carrots (or 3 medium size)
  • 3 eggs
  • 200 grams of butter
  • 2 cups of sugar
  • 2 cups of flour
  • baking soda


p r e p a r a t i o n :

pre-heat oven to 180°C

peel the carrots and grate them. melt the butter (reserve some for greasing the pan later).


in a mixer, add the melted butter, the grated carrots, the sugar and the eggs. mix it well.


in a bowl, add this cream to the flour, mix well. add the baking soda and mix with a spoon.


grease a baking pan with butter
pour the dough in it
put it in the oven for about 30-40 minutes

as a personal tip, I like to sift all the dry ingredients just to make sure there are no lumps. it is very hard, if not impossible, to get rid of them once the carrot cream is poured on it.

the classic carrot cake has a chocolate topping, but I prefer mine with less calories, it is delicious without it too!

adding the baking soda when you're done with mixing and stirring it with a spoon is a tip my mom gave me. I am not exactly sure why, but she says one shouldn't mix the baking soda with the mixer. go figure!

Wednesday, July 22, 2015

noodle rucola salad


i n g r e d i e n t s :
  • "penne" noodles
  • rucola
  • grated parmesan
  • sun-dried tomatoes
  • pine nuts
  • salt, pepper, aceto balsamico (or vinegar)


p r e p a r a t i o n :
very simple!
wash the rucola and cook the noodles


roast the pine nuts on a frying pan until they turn gold brown


when everything has cooled off, mix all ingredients on a salad bowl, adding the sun-dried tomatoes and the grated pamesan to it.


spice it with pepper, salt (if necessary) and a bit of aceto balsamico. enjoy the salad and the summer!

Thursday, June 11, 2015

beetroot salad with banana and walnuts

summer is coming and nothing better than eating a delicious salad for lunch on hot days. and this salad isn't only delicious, it is exotic and healthy!

i n g r e d i e n t s :
  • 3-4 medium size beetroots (cooked)
  • walnuts
  • 1 banana
  • goat cheese
  • pumpernickel

p r e p a r a t i o n :

on medium heat, mash a banana in a frying pan, let it cool off a little.


grate the beetroots, be careful not to grate it too fine.


add them to the mashed banana.


crush the walnuts into smaller pieces and add it to the frying pan. mix everything.


serve on a plate with goat cheese and pumpernickel. enjoy!


Sunday, May 10, 2015

brigadeiro & beijinho

delicious brazilian truffles. there's no birthday party without them.


i n g r e d i e n t s :

  • 1 can of milkmaid ("leite moça", "la lechera", "Milchmädchen", whatsoever it is called in your country)
  • pure chocolate powder
  • chocolate sprinkles
  • grated desiccated coconut
  • butter
  • little cupcake molds
  • cloves

p r e p a r a t i o n :

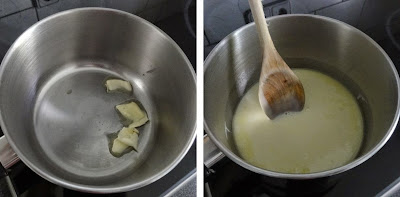
melt about 2 teaspoons of butter in a small saucepan at medium heat and add half of the milkmaid to it. mix well.


for the brigadeiro, add 3 spoons of chocolate, continuously stirring at medium heat, it will turn thicker and thicker, go on stirring vigorously, until you start seeing the bottom of the saucepan. keep a close eye on the heat, lower it if necessary. put it aside to cool off.


for the beijinho, repeat the step with melting butter and milkmaid above. add 5 spoons of the coconut flakes, always stirring at medium heat, just like you made it with the brigadeiro. at some point you'll see the bottom of the saucepan. put it aside to cool off.


time to remember the time in kindergarten when we used to play with modelling clay!
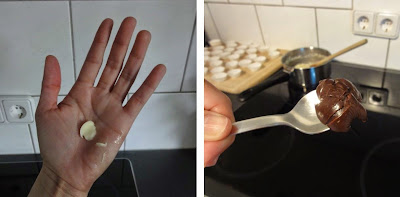
prepare the little paper cupcake molds and butter your palms (yes!!!)


take about a teaspoon of the brigadeiro (start with this one cause it will be cooled off by then) and mould it into a little ball. for obvious reasons I couldn't take photos of myself doing it :D

roll the little ball in the chocolate sprinkles and then put it in the little cupcake mold.


when you're done with the brigadeiro, do the same with the beijinho. make sure you have enough butter on your palms to be able to mould them, otherwise it'll stick to your skin. roll the beijinho balls on the coconut flakes. put them in the cupcake molds.


for the final touch, decorate the beijinhos with cloves, it also adds a great taste to it. enjoy!

t r i v i a :

brigadeiro means "brigadier"
beijinho means "little kiss"

Friday, May 8, 2015

transforming a t-shirt into a girlie

we all know the problem (particularly petite women like myself): there's this band we love, we want so much to buy the t-shirt but they only offer models for men, or the girlies they have are boring and all the cool designs are available only for men.

now, all you need to change that is:

  • thread
  • needle
  • scissors
  • kajal (black or white, depends on the color of your t-shirt)
  • your favorite girlie
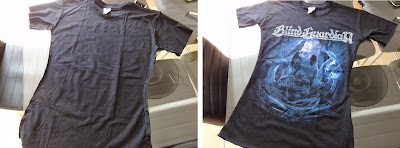
turn the t-shirt inside out and lay it on a table, stretching it perfectly straight, mind the seams. try to make it as perfect as possible. then lay your favorite girlie on top. it's the template.


draw the shape of your girlie with the kajal. you should get its outline on the larger t-shirt.


for the sleeves, just continue the line until the edge.


now, gather all your courage, it's time to cut! shorten the sleeves right above the seam. cut the bottom exactly at the outline and for the sides leave an edge as thick as your forefinger.


sew the sides from the bottom to the end of the sleeves. try to make small stitches, it should look neat!


when you're done with sewing, turn the t-shirt on the right side. it's time to prep the sleeves.


roll up the sleeves twice, as thick as your forefinger. secure the upper and lower parts with small stitches.


there you've got your girlie. now you can say "been there, done that, got the t-shirt".

Thursday, March 5, 2015

barefoot through hiroshima

this is the story of a survivor.

barefoot gen is the most impressive testimony of war I have ever read. all quiet on the western front delivers a similar experience, but barefoot gen really gets under the skin. perhaps because the protagonist is a child or maybe because it's told in a comic book format.

the author keiji nakazawa, who survived the nuclear bomb dropped in hiroshima, goes into details to tell his own story.


barefoot gen is available in more than 20 languages and it should be a compulsory book to be read by anyone who wants to learn more about the firepower and devastation of a nuclear bomb.

it's impossible not to swallow hard while reading this book.

nevertheless, gen is a 6 years old child and his tragic story will also bring us some moments of redemption. after all, the author didn't only survive this barbaric act, he lived to tell how and his work is almost a manifesto. despite all the suffering, he didn't lose hope and his faith in mankind.


comic books are actually a unique medium to practice a new language you are learning. with barefoot gen one can practice a foreign language and learn more about history at the same time.


 one sure thing: you will never forget his story.


Tuesday, February 24, 2015

travelling by bus

europe is a popular destination for backpackers for several reasons, I can quickly name some: it's a tiny and very diverse continent, one can get to know many cultures in a short time and for little money; the countries mostly share one currency; its infrastructure is very good; you can communicate with practically everybody if you speak at least the most spoken language in the world, which is bad english, etc.

in particular, germany stands out in this matter for me. up to 2013, bus travel inside germany was forbidden. if you wanted to go from munich to berlin, for example, people either had to fly, go by car or take the train inside germany. and these options are usually pricey.

there's of course a reason behind that, the german railway a.k.a. die deutsche bahn, a private company which belongs 100% the state (huh?) lobbied long enough on its own favor, however, they couldn't stop the free market any longer and eventually gave in. even other railway companies are taking their first steps in the german transportation market.

back to buses!

the market is booming in germany and travelling by bus is so ridiculously cheaper, comparing to deutsche bahn, that I just felt like spreading the word for those who still think the only way to travel throughout germany is by train.

the buses are brand new, comfortable and they offer free wifi. a bus ride takes obviously longer than the train, but it's totally worth it! if you are going to germany anytime sooner (or later), make sure to check your options before you buy the (in)famous german-railway-pass for hundreds of euros.

personally I can speak of eurolines, flixbus and adac-postbus.


the ride with eurolines (düsseldorf-paris-düsseldorf) was an adventure. the round trip costed less than an one-way ticket with the train. it was a night ride, but it didn't stop the driver from listening to the radio or talking out loud on the phone. both departures were delayed, the trip back was even 90 minutes delayed (!). do it if you can fall asleep no matter what and want to spare the money you'd spend with a hostel.


flixbus (now united with meinfernbus) was good. they had wifi and comfy busses, the departure was on time and the ride was pleasant. I went from düsseldorf to berlin with them for very very little money.


the winner by all means was adac-postbus ♥ they had the newest bus, wifi, power outlets at every seat, a smooth driver, coffee machine in the bus, snacks, soft drinks, entertainment program (like on flights) and they were strictly on time. the ride back from berlin to düsseldorf didn't cost any cent more than with flixbus.

all in all, there are other companies and these companies also travel to other countries, so, if you're coming to europe, make sure you check the bus companies' websites. there's life outside the train and definitely light at the end of the tunnel!

Thursday, January 8, 2015

landscape photography

nowadays everybody has got a camera, even if it's only the cellphone's one, however, owning a camera doesn't make us a photographer (unfortunately!).

how to take better pictures? well, there is no universal recipe. we only have to pay attention to some minor but crucial details. for example, while photographing landscapes.

keep the horizon line horizontal when photographing at the beach. if necessary, activate the grid on your camera. it makes a great difference. some pics might theoretically gain from diagonal horizon, but in most cases it is better to keep that line straight.

omg here the water is leaking out to the left!

aahhh better this way!


worst case scenario, this can be corrected later with the computer using fine rotation.

the "rule of thirds"
usually it's preferable if the horizon line is either 1/3 from the top or 1/3 from the bottom of the pic. choose between those depending on what you want to show more. if you are showing the clouds, you make it lower, if you are showing the ground - it goes higher. of course this doesn't apply to all pictures, it's just that for MOST pics the 1/3-2/3 relation looks better than 1/2-1/2. there are cases when 1/2 is better (e.g. if you want to show mirror-symmetry of the sky and sea), but they are more rare.

the horizon line isn't so evident when we protograph mountains. we have to pay attention to the photo garbage (this is also valid for beach photos): wire, poles, cables, or whatever doesn't fit to your theme.

mind the pole on the lower right corner
cropped it!

more photo-garbage on the right corner

get rid of it by cropping the picture


there are simple light tricks to make the best out of our photos. check this sunset picture:


colors are stunning, yet one can see the power cable at the upper edge. we can solve this problem by cropping the pic like the examples above, still, the two white tent tops don't look that good.
below you see the picture was taken again, zoomed in, with focus on the sun. that made all the other elements look darker and the pic looks better.

and this time the power cable wasn't on the pic
almost every landscape pic looks better if it shows the volume, multiple layers, so to speak. if you just shoot the sunset or mountains it's ok, but it might appear flat, on the other hand, when you have something in the foreground (a boat; some three leaves; grass blades; etc.) the pic gains this volume because the image gains perspective.

have fun photographing your moments and make them look better than ever!

Thursday, December 11, 2014

saving stale bread!

you know what to do with that brick-hard piece of baguette or white rolls you've got at home? you turn them into delicious butter toasties in few steps.


slice the baguette (or rolls) like below, butter both sides with (preferably) salty butter.


toast both sides on a frying pan until it turns gold brown. yummy!


now the only thing left to do is to marvel at how bread you thought inedible turns into fine toasties.
I had mine with red wine. cheers!